Draw Circle in Html 4
Before nosotros start. If y'all want more complimentary content only in video format. Don't miss out on my Youtube aqueduct where I publish weekly videos on FrontEnd coding.
https://www.youtube.com/user/Weibenfalk
----------
Are you new to web development and CSS? Have yous ever wondered how those nice shapes are made that you meet all over the internet? Wonder no more. Y'all've come to the correct identify.
Beneath I volition explain the very basics of creating shapes with CSS. There's a lot to tell y'all about this topic! Therefore I will not cover all (far from all) tools and shapes but this should requite you a bones idea of how shapes are created with CSS.
Some shapes require more "gear up and tricks" than others. Creating shapes with CSS is commonly a combination of using width, height, top, right, left, border, lesser, transform and pseudo-elements similar :before and :afterwards. We also have more mod CSS properties to create shapes with like shape-outside and clip-path. I'll write well-nigh them below also.
CSS Shapes - The basic way
By using a few tricks in CSS we've ever been able to create basic shapes like squares, circles, and triangles with regular CSS backdrop. Let's await at a few of them now.
Squares and rectangles
Squares and rectangles are probably the easiest shapes to reach. By default, a div is e'er a square or a rectangle.
Y'all set the width and peak as shown in the below code. Then it's but a matter of giving the element a groundwork color. You can have whatever other backdrop you desire on the chemical element.
#square { background: lightblue; width: 100px; meridian: 100px; } 
Circles
Information technology's almost every bit like shooting fish in a barrel to create a circumvolve. To create a circumvolve nosotros can set the border-radius on the element. This will create curved corners on the element.
If we prepare it to 50% it will create a circumvolve. If you lot set a different width and summit we will become an oval instead.
#circle { background: lightblue; border-radius: l%; width: 100px; height: 100px; } 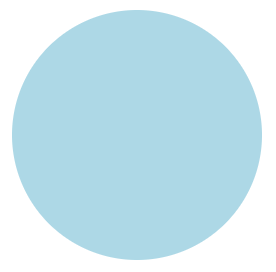
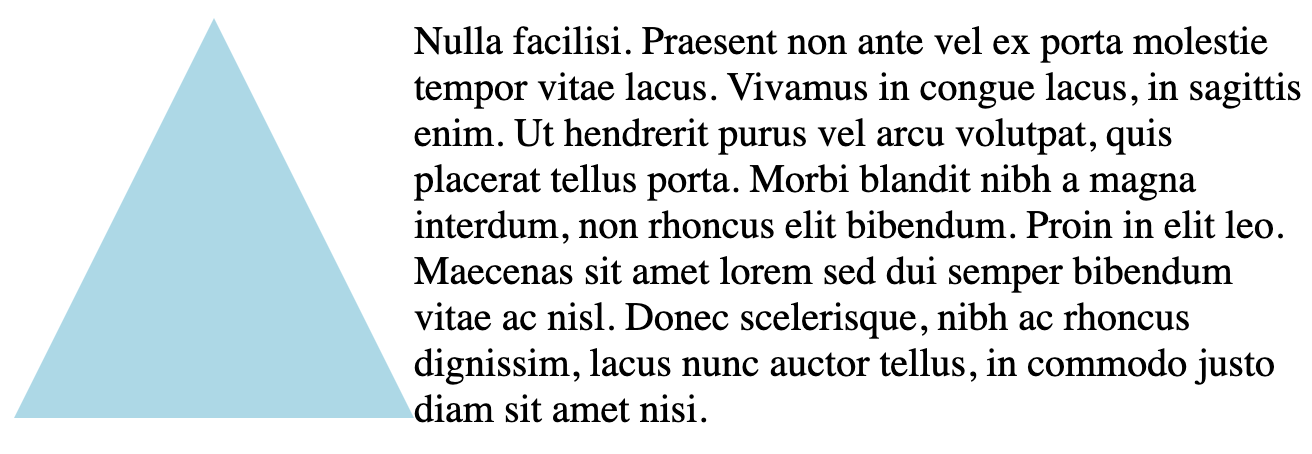
Triangles
Triangles are a little trickier. We have to ready the borders on the element to friction match a triangle. Past setting the width and meridian to goose egg on the element, the bodily width of the element is going to be the width of the border.
Keep in heed that the border edges on an element are 45 degree diagonals to each other. That's why this method works to create a triangle. Past setting one of the borders to a solid color and the other borders to transparent it will accept the form of a triangle.
#triangle { width: 0; height: 0; border-left: 40px solid transparent; edge-right: 40px solid transparent; border-bottom: 80px solid lightblue; } 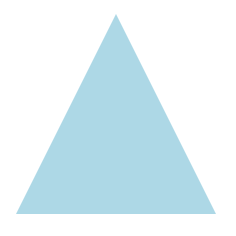
If you lot want to accept a triangle/arrow pointing in some other direction You can change the border values corresponding to what side you want to be visible. Or yous tin can rotate the chemical element with the transform property if you want to be actually fancy.
#triangle { width: 0; height: 0; border-meridian: 40px solid transparent; border-right: 80px solid lightblue; border-lesser: 40px solid transparent; } 
Alright – that'south an intro to basic shapes with CSS. There are probably an endless corporeality of shapes you can think of to create. These are just the fundamentals, but with a little creativity and determination you tin attain a lot with simply basic CSS properties.
In some cases, with more advanced shapes, it'due south also a good thought to use the :after and :before pseudo selectors. This is out of scope of this article though as my intention is to cover the nuts to get yous going.
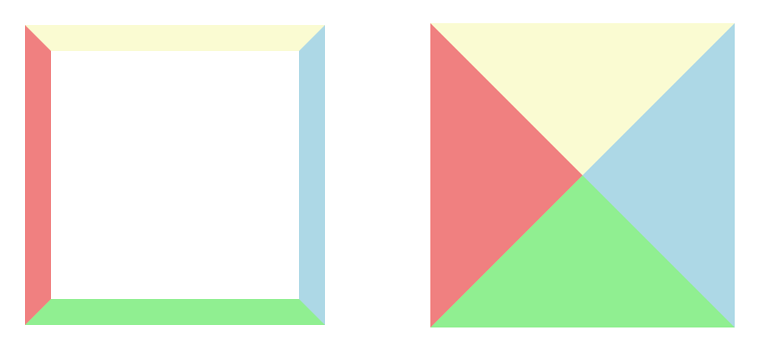
Disadvantage
There is one big disadvantage with the above approach. For example, if you lot want your text to menses around and wrap your shape. A regular HTML div with background and borders to make up the shape won't let that. The text will non suit and flow around your shape. Instead it will flow around the div itself (which is a foursquare or a rectangle).
Below is an illustration showing the triangle and how the text will catamenia.
Luckily nosotros have some modernistic CSS backdrop to employ instead.
CSS Shapes - The other style
Present we accept a holding chosen shape-exterior to use in CSS. This holding lets you define a shape that the text will wrap/menstruation around.
Along with this property we have some basic shapes:
inset()
circle()
ellipse()
polygon()
Hither'south a tip: You can also use the prune-path property. You can create your shape with that in the same way, just information technology won't let the text wrap around your shape like shape-outside does.
The element that we are going to apply the shape to with the shape-outside property to has to be floated. It also has to take a defined width and height. That's actually important to know!
Yous can read more than about why here. Beneath is also a text that I've taken from the provided link to developer.mozilla.org.
The shape-outside holding is specified using the values from the listing below, which define the float surface area for float elements. The bladder surface area determines the shape around which inline content (float elements) wrap. inset()
The inset() blazon can be used to create a rectangle/square with an optional offset for the wrapping text. It allows you to provide values on how much you desire your wrapping text to overlap the shape.
You can specify the commencement to be the aforementioned for all four directions like this: inset(20px). Or information technology can be individually fix for each direction: inset(20px 5px 30px 10px).
Y'all can use other units as well to set the offset, for example, percent. The values correspond like this: inset(pinnacle right lesser left) .
Cheque out the below lawmaking example. I've specified the inset values to be 20px at the top, 5px to the right, 30px at the bottom and 10px to the left. If yous want your text to become around your square instead yous can just skip using inset() at all. Instead set the background on your div and specify the size equally usual.
#square { float: left; width: 100px; height: 100px; shape-outside: inset(20px 5px 30px 10px); background: lightblue; } 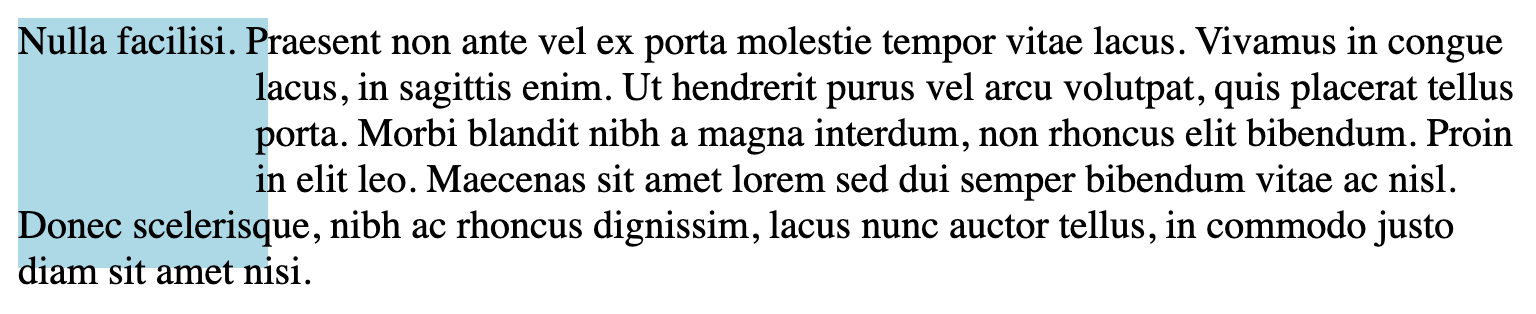
It is also possible to give inset() a second value that specifies the border-radius of the inset. Like below:
#square { float: left; width: 100px; meridian: 100px; shape-outside: inset(20px 5px 30px 10px round 50px); background: lightblue; } 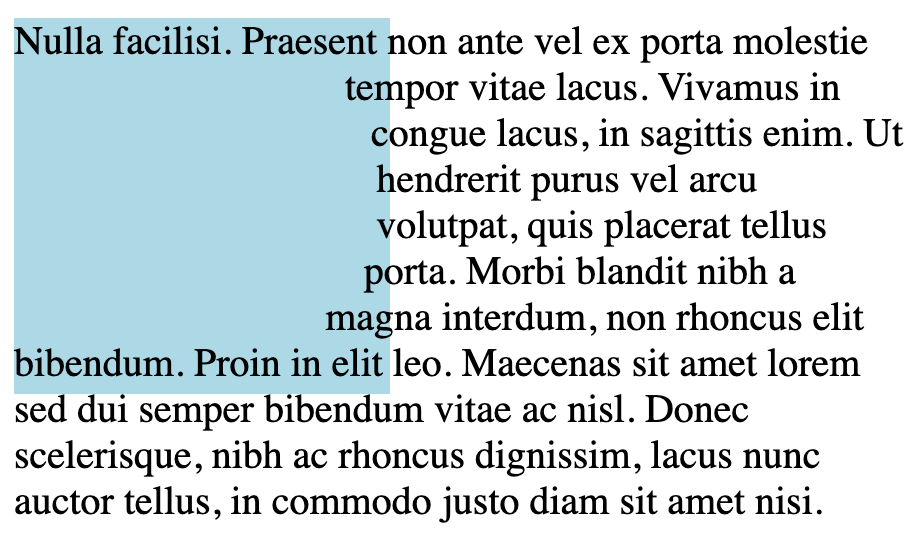
circle()
In this 1 a circle is created using the shape-exterior property. You lot besides take to employ a prune-path with the corresponding property for the circle to show up.
The clip-path holding tin can accept the aforementioned value as the shape-exterior property so nosotros can requite it the standard circle() shape that we used for shape-outside. Also, note that I've applied a 20px margin on the element here to requite the text some space.
#circle { float: left; width: 300px; pinnacle: 300px; margin: 20px; shape-outside: circle(); clip-path: circle(); background: lightblue; } 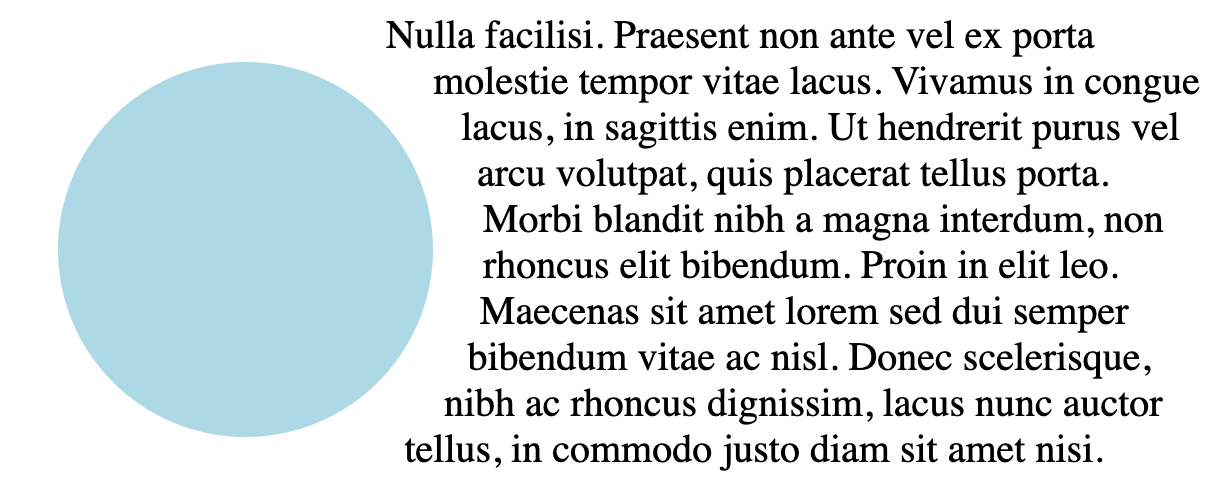
In the above example, I don't specify the radius of the circle. This is because I desire information technology to be as big every bit the div is (300px). If y'all want to specify a dissimilar size for the circle yous can do that.
The circumvolve() takes two values. The offset value is the radius and the second value is the position. These values volition specify the center of the circle.
In the below example I've set the radius to 50%. Then I have shifted the center of the circumvolve by xxx%. Note that the word "at" has to be used between the radius and position values.
I've besides specified another position value on the clip-path. This will prune the circle in half as I motion the position to zip.
#circumvolve { float: left; width: 150px; elevation: 150px; margin: 20px; shape-outside: circumvolve(50% at xxx%); clip-path: circle(fifty% at 0%); background: lightblue; } 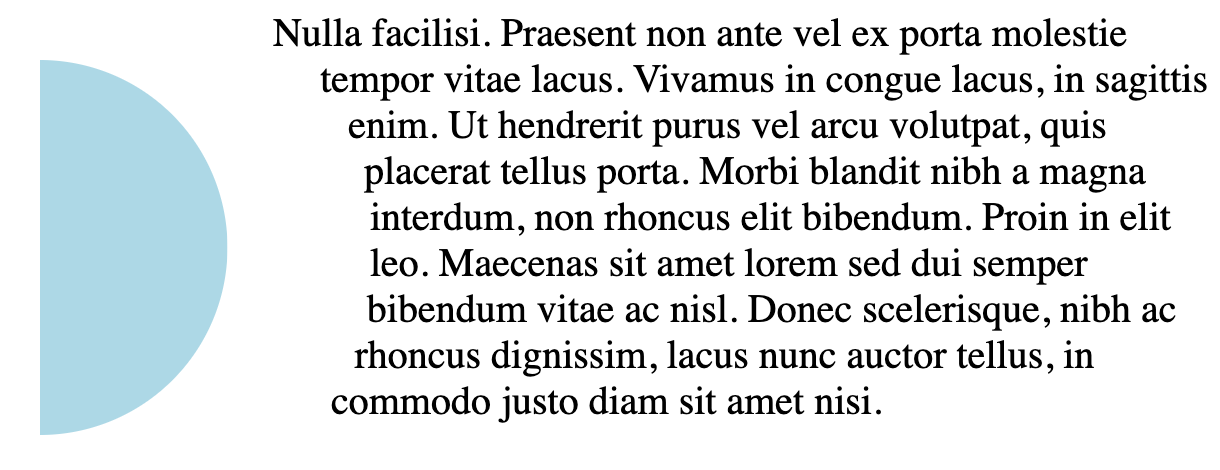
ellipse()
Ellipses work the same way as circles except that they create an oval. Yous tin can define both the X value and the Y value, like this: ellipse(25px 50px).
The same as a circle, it also takes a position value every bit the last value.
#ellipse { float: left; width: 150px; height: 150px; margin: 20px; shape-exterior: ellipse(twenty% 50%); prune-path: ellipse(20% 50%); background: lightblue; } 
polygon()
A polygon is a shape with different vertices/coordinates divers. Below I create a "T" shape which is the first letter in my name. I kickoff from the coordinates 0,0 and move from left to right to create the "T" shape.
#polygon { float: left; width: 150px; height: 150px; margin: 0 20px; shape-exterior: polygon( 0 0, 100% 0, 100% 20%, lx% 20%, threescore% 100%, 40% 100%, xl% 20%, 0 20% ); clip-path: polygon( 0 0, 100% 0, 100% 20%, 60% xx%, sixty% 100%, 40% 100%, 40% twenty%, 0 20% ); background: lightblue; } 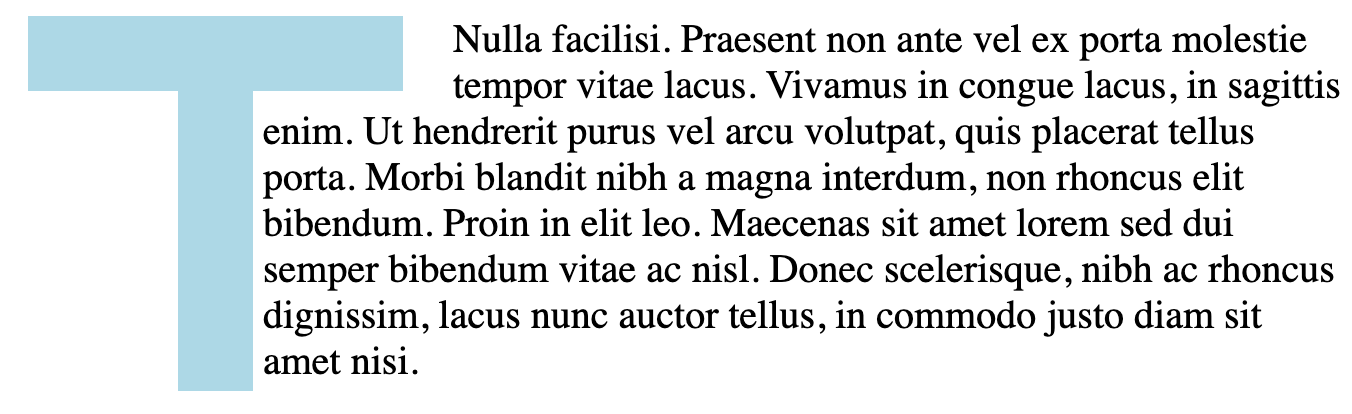
Images
You can also use images with transparent backgrounds to create your shape. Like this round cute moon beneath.
This is a .png image with a transparent background.
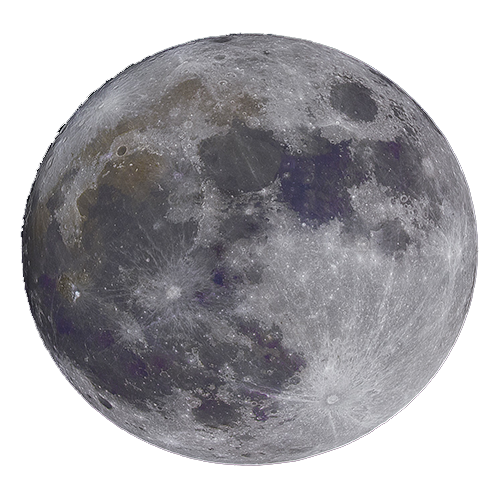
<img src="src/moon.png" id="moon" /> #moon { float: left; width: 150px; peak: 150px; shape-outside: url("./src/moon.png"); } 
And that's it! Thank you lot for reading.
Well-nigh the author of this article
My proper noun is Thomas Weibenfalk and I'1000 a programmer from Sweden. I regularly create free tutorials on my Youtube channel. There's also a few premium courses out there on React and Gatsby. Feel gratuitous to visit me on these links:
Twitter — @weibenfalk,
Weibenfalk on Youtube,
Weibenfalk Courses Website.
Learn to code for costless. freeCodeCamp's open up source curriculum has helped more than 40,000 people get jobs as developers. Get started
Source: https://www.freecodecamp.org/news/css-shapes-explained-how-to-draw-a-circle-triangle-and-more-using-pure-css/
Publicar un comentario for "Draw Circle in Html 4"